Ever Wondered How to Write Software to Control a CNC for a Common Task Like Flattening Wood?
Greetings, software engineers! If you’ve ever been curious about programming a CNC machine to do something simple like flatten a slab using a programming language other than the CNC's native GCode, this post is for you. I’ve written a Perl program that generates universal CNC GCode (think GRBL, Mach3, Masso, or BuildBotics) to do just that. It’s fast, efficient, and way less of a headache than traditional CNC software. A quick note: GCode is a language telling CNC machines where and how to move—like GPS for a router.
The Setup: From Web Form to Flat Wood
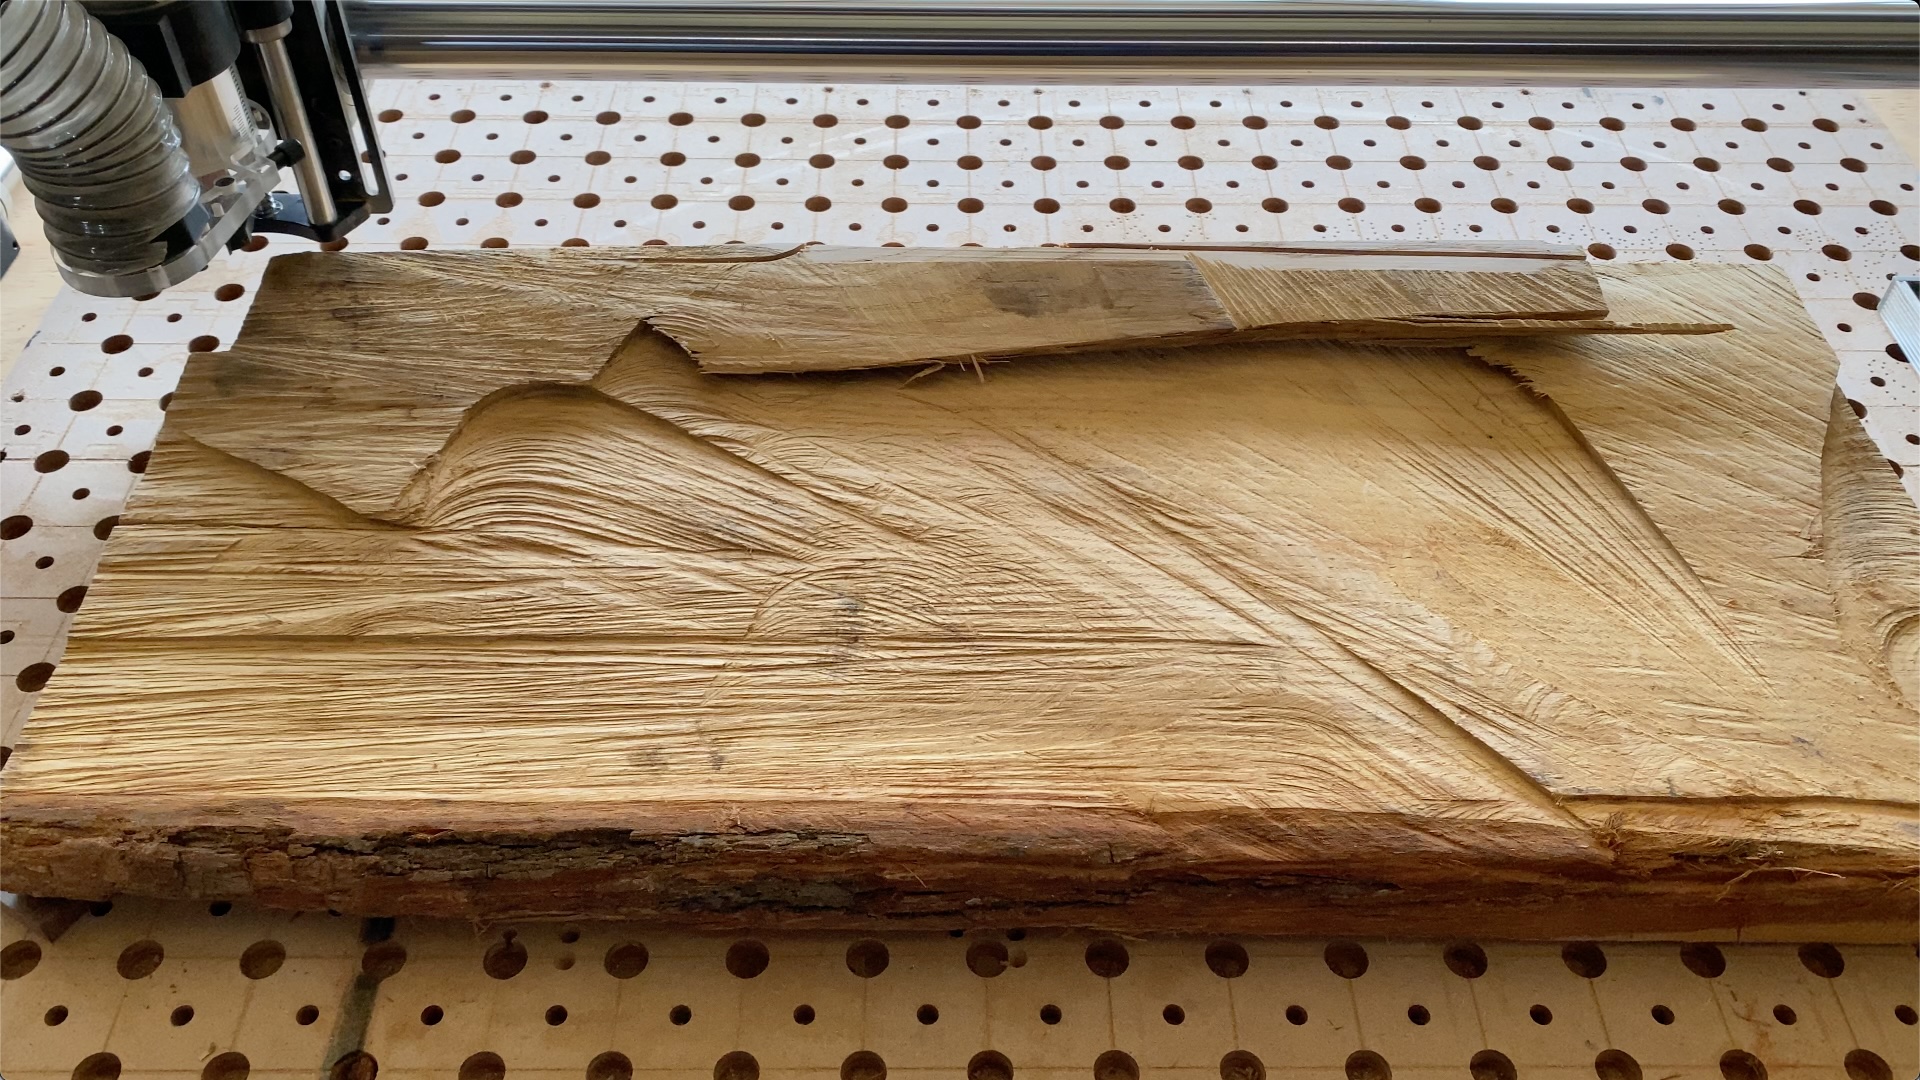
Picture this: you’ve got a gorgeous oak slab—36” long, 16” wide, 3” thick—but it’s a little wonky. Or, more likely, it's an ugly slab that lost a horrific fight with a chainsaw, like the specimen shown above. Either way, you want it flat, and I’ve got a web form at windridgewoodcrafts.com/utilities/cnc_flat/ that makes it happen. You punch in some details, hit submit, and an instant later, GCode lands in your inbox. Here’s what goes in, using our oak slab as an example:
- CNC Dimensions: My machine’s workspace is X: 48” (width), Y: 32” (length), Z: 6” (height).
- Slab Dimensions: The oak slab is 36” long, 16” wide, 3” thick, laid sideways to fit.
- Bit and Spindle Details: We’re using a 1.25” diameter end mill bit (2 flutes), cutting 0.03” per pass (depth of cut or DOC), with a spindle speed of 16,000 RPM and a feed rate of 240 inches per minute (IPM).
Heads-up: You can use inches or millimeters, but everything’s gotta match. We’re sticking with inches here (the default).
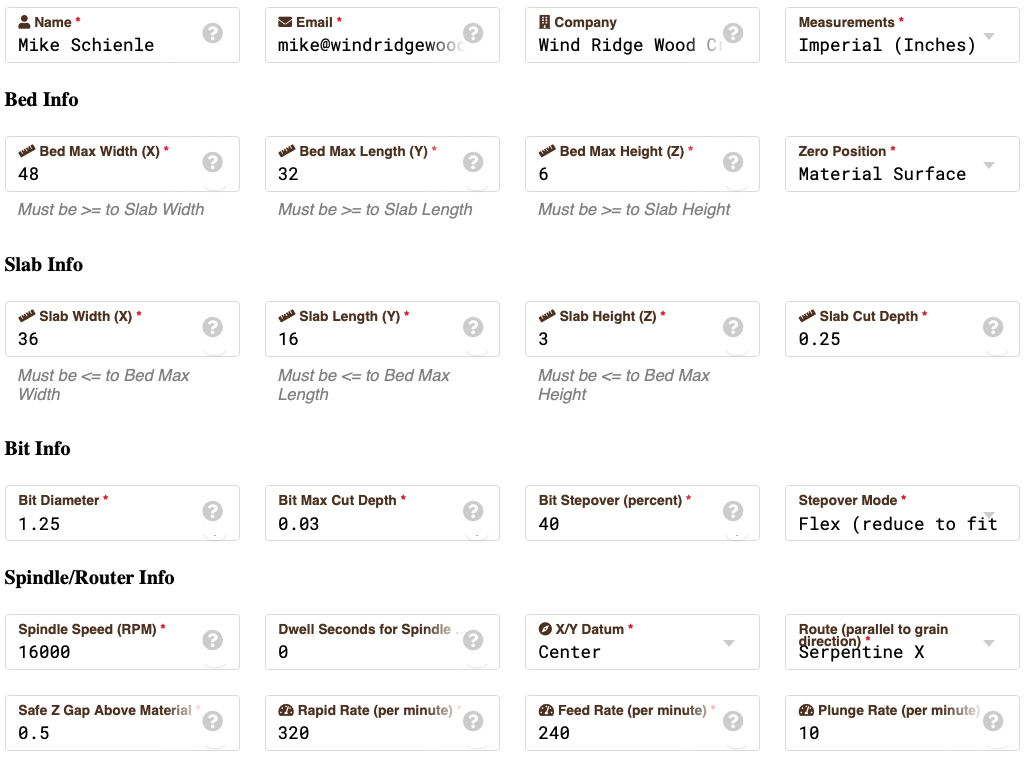
Here's the web form filled out with the parameters we're discussing in this blog.
The Magic: Perl Turns Inputs into GCode
Once you submit the form, the contents are dropped into a database and the Perl program takes over. The program checks for any unprocessed records and begins processing them. It’s like a conductor orchestrating a symphony of cuts. The software loops through a series of X and Y passes, then changes the Z depth, and repeats until the slab’s flat—removing 1/4” of height in tiny 0.03” slices. Here’s how it breaks down:
- Sanity Checks: It ensures the slab fits the CNC. Too big? You’ll get an error—no CNC crashes allowed!
- GCode Creation: It calculates passes with a 40% stepover (more on that soon) and spits out GCode lines in under 0.1 seconds. The actual code creation and file writing happens in under 0.01 seconds, the rest is due to database queries and updates, then sending an email with the attached file. The GCode files are typically in the 20 KByte range, and are plain text, so readable with some understanding of the commands in GCode, which we'll get to right after this snippet.
Perl Snippet (Input Handling):
    # check if Slab is larger than Bed in X, Y and Z
    if ($dbData->{Slab_X} > $dbData->{Bed_X}) {
        $text = sprintf "Slab X (%0.2f) > Bed X (%0.2f)", $dbData->{Slab_X}, $dbData->{Bed_X};
        push @errors, "$text";
    }
    # repeat for Y and Z
    # Anything in @errors causes the program to return a message without a file attachment

    # check the datum (center vs. lower-left)
    if ($dbData->{XY_Datum} =~ /Center/i) {
        $xMax  = ($dbData->{Slab_X} / 2) + ($dbData->{Bit_Diameter} / 2) - $bitStep;
        if ($xMax > ($dbData->{Bed_X} / 2)) {
            $text = sprintf "xMax (%0.2f) > (Bed_X / 2) (%0.2f), adjusting xMax", $xMax, $dbData->{Bed_X} / 2;
            # OK for warnings, indicates slab and bed alignment need to be precise, mention in email body,
            push @warnings, $text;
            $log->warn($text);
            $xMax = $dbData->{Bed_X} / 2;
        }
        $xMin   = 0 - $xMax;
        $xInit  = $xMin;
        $xOff   = $xMax * 2;
        @xSteps = ();

        # check the route, Serpentine X or Y
        if ($dbData->{Route} =~ /X/) {
            if ($xOff > $dbData->{Bed_X}) {
                $text = sprintf "xOff (%0.2f) > Bed_X (%0.2f), adjusting xMax", $xMax, $dbData->{Bed_X};
                push @warnings, $text;
                $log->warn($text);
                $xOff = $dbData->{Bed_X};
            }
        }
        ...
GCode 101: A Quick Rundown
New to GCode? Here’s what’s driving this:
- G0: “Move fast to this spot” (no cutting).
- G1: “Cut a straight line here.” Example:
G1 X10 Y5 Z-0.03 F240cuts to X=10”, Y=5”, Z=-0.03” at 240 IPM. - G2/G3: “Cut a clockwise (G2) or counterclockwise (G3) arc.” Think carving a 0.5” diameter curve—smooth!
- I: Used with G2/G3, specifies the incremental distance from the starting point to the center of the arc along the X-axis.
- J: Used with G2/G3, specifies the incremental distance from the starting point to the center of the arc along the Y-axis.
- G02 X-17.9 Y8.4 I0.25 J0.00: Going clockwise, from last coordinates to X=-17.9", Y=8.4", create a 0.25" arc in X and 0" in Y
- G20: “Measurements are in inches” (instead of G21 for millimeters).
- G90: “Use absolute coordinates" (instead of G91 for relative coordinates).
- F: Sets the feed rate—like
F240for 240 IPM. - M03/M05: “Start the spindle” (M3) or “Stop it” (M5)—simple on/off switches.
- S: Sets the spindle RPM—like
S16000for 16,000 RPM.
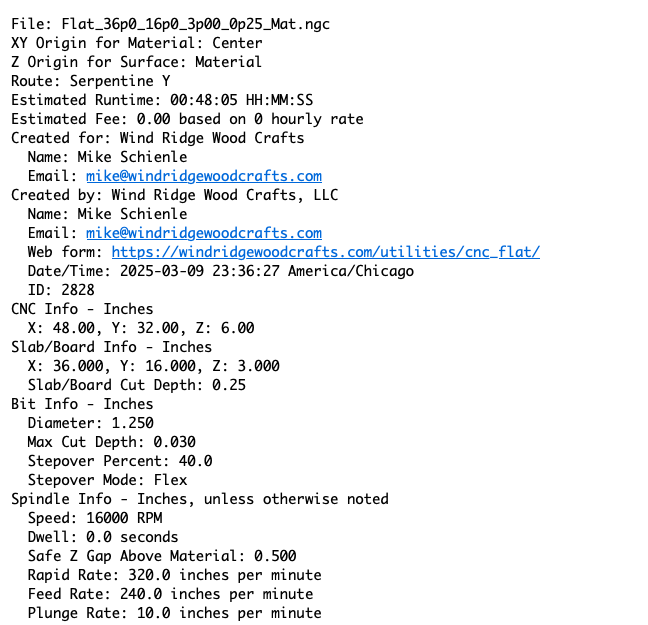
Perl Snippet (GCode Output): GCode comments are enclosed in parentheses
(CNC Info - Inches )
(  X: 48.00, Y: 32.00, Z: 6.00 )
(Slab/Board Info - Inches )
(  X: 36.000, Y: 16.000, Z: 3.000 )
(  Slab/Board Cut Depth: 0.25 )
...
(Get started, G90 is absolute coordinates, G20 is inches)
G90
G20
(Set spindle speed to 16,000 RPM, then start the spindle)
S16000
M03
F320.0
G00 Z0.5000
G00 X-18.1250 Y-8.1250 Z0.5000
F10.0
G01 X-18.1250 Y-8.1250 Z0.0000
( -- Z 1/9 -- )
F10.0
G01 X-18.1250 Y-8.1250 Z-0.0278
F240.0
G01 X-18.1250 Y8.1250 Z-0.0278
G02 X-17.8767 Y8.3733 I0.2483 J0.0000
G02 X-17.6284 Y8.1250 I0.0000 J-0.2483
G01 X-17.6284 Y-8.1250 Z-0.0278
G03 X-17.3801 Y-8.3733 I0.2483 J0.0000
G03 X-17.1318 Y-8.1250 I0.0000 J0.2483
(deleted 200+ lines of traversing left-right, right-left)
G03 X17.3819 Y-8.3733 I0.2483 J0.0000
G03 X17.6302 Y-8.1250 I0.0000 J0.2483
G01 X17.6302 Y8.1250 Z-0.0278
G02 X17.8785 Y8.3733 I0.2483 J0.0000
G02 X18.1268 Y8.1250 I0.0000 J-0.2483
G01 X18.1268 Y-8.1250 Z-0.0278
( -- Z 2/9 -- )
F10.0
G01 X18.1268 Y-8.1250 Z-0.0556
F240.0
G01 X18.1268 Y8.1250 Z-0.0556
G03 X17.8785 Y8.3733 I-0.2483 J0.0000
(deleted chunks of code for traversing through Z depths 2 through 9)
(...)
( -------- )
(wrap it up, set the speed to F320 - Rapid, move to Z0.5 - Safe Z, ...)
(... move to X0 Y0 - X/Y origin, turn off the spindle - M05, end the program - M02)
F320.0
G00 Z0.5000
G00 X0.0000 Y0.0000 Z0.5000
M05
M02
The result? An email with your GCode file and a link to ncviewer.com for simulation. Why simulate? To catch boneheaded mistakes—like typing 3” instead of 0.3” for depth. Trust me, you don’t want to mill your workbench! I'll provide the entire GCode file to download and check in the simulator later.
Key Settings Explained
Let’s unpack the inputs:
- Stepover (40%): This is the overlap between passes—like overlapping lawnmower rows. At 40%, each pass covers 40% of the last one’s path, balancing speed and finish.
- Cut Depth (0.03” per pass): We’re shaving off thin layers—like trimming grass little by little until it’s level. It’s fast and keeps heat under control.
- Spindle Speed (16,000 RPM) and Feed Rate (240 IPM): These keep things zippy without burning the wood or snapping the bit.
Oh, and watch out: a 4% stepover makes the CNC tiptoe—way too slow! 40% is average, 80% if your machine is industrial strength.
The Catch: Sanding (But Not Much)
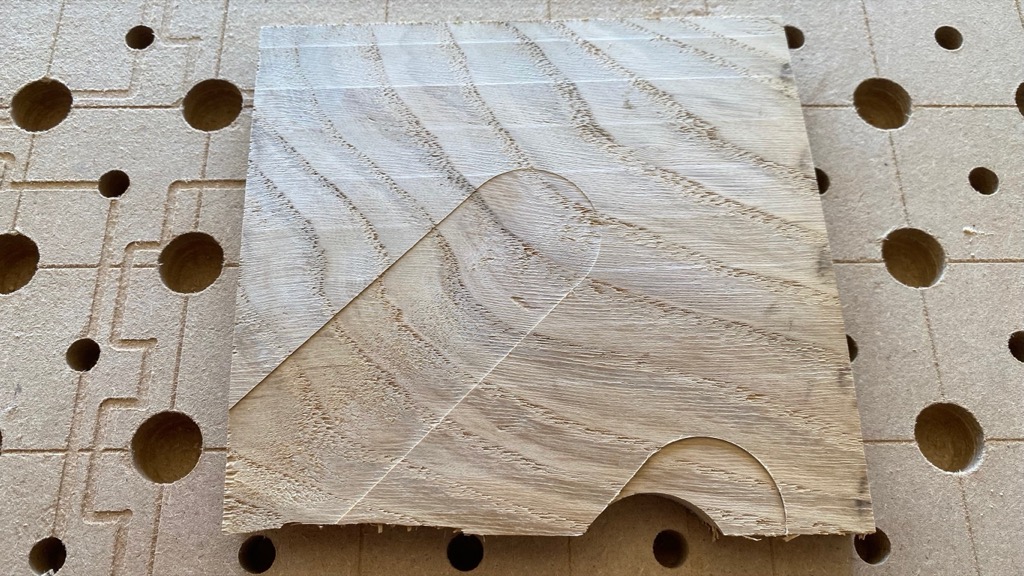
Flattening leaves faint tool marks—think combed hair going two ways. The bit’s straight passes along the grain mean a quick sanding pass is needed. Want less work? A final CNC pass with a smaller stepover and faster feed rate cuts sanding time. Still, a little elbow grease adds character, right?
Why I Did This (And Why It Rocks)
I built this because my $700 CNC software was killing me—2–3 minutes per toolpath to size the board, pick the bit, set speeds, blah blah. With this form and Perl combo, I’m done in under 30 seconds. Since sharing it, we’ve cranked out nearly 3,000 toolpaths. More time for CNC creativity, less for clicking and dragging—win-win!
Your Turn!
Wanna try it? Hit up CNC Slab Flattener web form, enter your slab’s specs, and grab your GCode. Then, simulate it at ncviewer.com to double-check. It’s stupidly satisfying—give it a shot!
If you just want to test the sample GCode file we used above, you can download it to your desktop and upload (or copy/paste) it to the NCViewer. The file is plain text, so you can open it with any simple text editor.
Want to see the original slab getting milled?
Happy coding (and maybe woodworking)!